
Create Your Own Multiplayer Game
in Unreal Engine 5 from Scratch!
Why this course? Because it's built differently.
This is not just a “do it like this” kind of course. It’s a “do it, and understand exactly why” course.
You’ll not only follow every step of the development process, you’ll deeply understand each decision, each system, and how everything fits together.
What makes this course truly special is the level of detail and clarity.
It’s one of the most in-depth Unreal Engine game courses available today, covering both beginner and advanced topics, from project setup to production-ready systems, with full refactoring and professional structure.
You won’t just copy features. You’ll learn HOW to design, build, and improve them like a real developer.
You’ll gain the knowledge to create systems that are clean, modular, network-ready, and optimized.
Build your game, and truly understand what you’re doing.
That’s what sets this course apart.
First Features
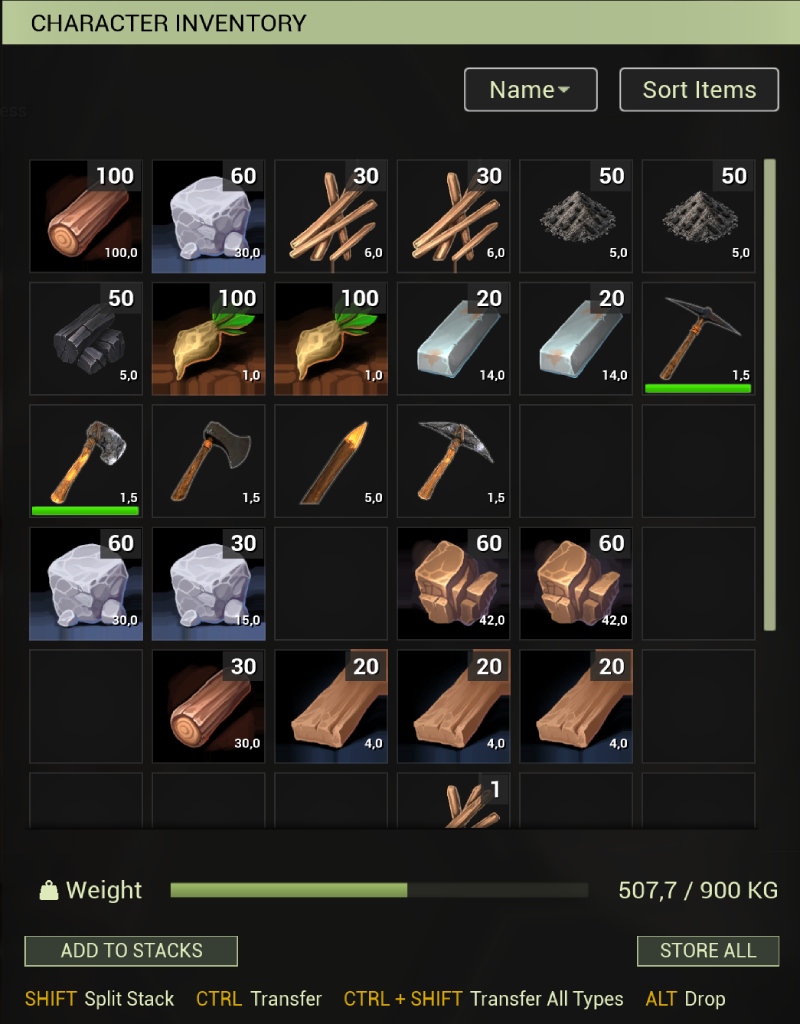
Ultimate Inventory System
The Inventory System is a multiplayer-ready, Blueprint-based solution for collecting, stacking, transferring, and managing items, complete with dynamic UI and replication support.

Dynamic Harvesting System
A simple, yet powerful system built for maximum flexibility. Every harvestable object is fully data-driven and controlled through assets, allowing you to define loot, resources, and behaviors for any imaginable object.
The system automatically scales with your design, supports dynamic configurations, and adapts seamlessly to the gameplay flow. Easy to set up, highly modular, and perfectly optimized for multiplayer environments, harvesting has never been this dynamic and effortless.

Ultimate Crafting System
Everything you need to create advanced crafting stations, process resources, manage fuel, handle input and output inventories, and drive recipes through clean data assets. Every part is designed to be modular, expandable, and easy to adapt for different gameplay devices.
Whether you want a simple workbench, a fueled smelter, a cooking station, or a fully automated production device, the Ultimate Crafting System gives you a strong Blueprint-only foundation with proper multiplayer support and professional structure.

Hotbar / Equipment System
The Hotbar & Equipment System combines responsive gameplay with intuitive design.
Players can instantly access items through scroll navigation or hotkeys, with visual feedback highlighting the selected slot.
The system supports seamless equipping and unequipping of weapons or tools, powered by a fully replicated Equipment Component that ensures multiplayer synchronization.
The Equipment Component handles item validation, attachment, and state tracking, including whether an item is currently equipped or not. It integrates directly with the Hotbar and Inventory systems, allowing for automatic equipping when switching slots, while keeping both client and server in sync.
From slot interaction to visual cues, this system delivers a smooth, network-aware foundation for any survival or action-oriented game.

High Quality Assets
You'll get access to high-quality, free-to-use assets tailored for your game. These include tools and weapons like a stone axe, iron axe, pickaxes, spear, bow, and more.
All assets are optimized for use in your own projects and come ready for integration into the inventory, hotbar, and equipment systems. Perfect for rapid prototyping or building a complete, immersive game experience.

Gameplay Camera
The Gameplay Camera System features a smooth first & third-person camera with dynamic zoom, shoulder switching, and collision handling, providing a responsive and immersive player experience in multiplayer scenarios.

Modular UI Power
Styled, Reusable, Flexible
Learn how to build a fully modular UI system using Common UI framework.
Create customizable panels, responsive layouts, and reusable widget components that adapt to any design.
Implement a centralized styling system to globally control fonts, text colors, and layout behaviors, ensuring full creative flexibility.
The course features custom-built widgets for clean integration, fast iteration, and total control over your game’s interface.

Motion Matching
The Motion Matching System enables responsive, fluid character movement by selecting animations dynamically based on real-time player input and motion data, fully optimized for multiplayer environments.

English & German
The course is fully available in both English & German audio.
German lectures are being added step by step, and you can always check the current translation and sync progress on the Discord server
27 Hight quality Subtitles: English · German (Deutsch) · French (Français) · Spanish (Español) · Portuguese (Português – Brazil) · Italian (Italiano) · Polish (Polski) · Turkish (Türkçe) · Russian (Русский) · Arabic (العربية – Saudi Arabia) · Hindi (हिन्दी – India) · Korean (한국어 – Korea) · Chinese (中文 – Simplified) · Chinese (中文 – Hong Kong) · Japanese (日本語 – Japan) · Ukrainian (Українська – Ukraine) · Dutch (Nederlands) · Czech (Čeština) · Swedish (Svenska) · Danish (Dansk) · Finnish (Suomi) · Norwegian (Norsk) · Thai (ไทย) · Indonesian (Bahasa Indonesia) · Greek (Ελληνικά) · Bengali (বাংলা – Bangladesh) · Vietnamese (Tiếng Việt)
The course currently features over 230 in-depth lectures
with more than 70 hours of step-by-step content.
New material is added regularly!

Clean - Structured - Commented
Are you tired of messy spaghetti Blueprints and guessing what each node does?
Every Blueprint is cleanly structured, professionally organized, and fully commented, so you always know what’s happening and why. No clutter. No chaos. Just clear, production-ready logic designed to help you learn faster and build smarter.
Whether you’re a beginner or looking to level up, this is how real game development should look.
100% Blueprint Only!
This course is designed to be incredibly beginner-friendly, guiding you step by step through every system with clear explanations of each Blueprint Node, interface, and function.
Nothing is skipped, and every action is backed by a detailed explanation of why it is done, ensuring you not only follow along, but truly understand the logic behind each feature.
Whether you're just starting out or looking to level up your Unreal Engine skills, this course offers a structured, in-depth learning experience for all levels.

Advanced Gameplay Ability System
Blueprint Only & Fully Modular
This Course includes a custom-built gameplay ability system inspired by GAS (Gameplay Ability System), designed entirely in Blueprints.
It uses Gameplay Tags, Gameplay Effects, and Ability Components to dynamically manage core attributes like Health, Food, Water, Stamina, Oxygen, Weight and other.
The UI reacts in real-time to changes triggered by effects, abilities, or state-based logic, including dynamic conditions such as Status.Water.Thirsty or Status.Health.Low.
All systems are cleanly separated, fully commentated, and optimized for multiplayer, giving you a professional grade foundation for survival mechanics, state-driven logic, and reactive UIs and much more!
What Students Are Saying About the Course

Why do I use AI Voiceover?
Unfortunately, my personal voice is not the best fit for delivering the course content clearly and understandably, especially since I am not a native English speaker and I am from Germany.
To ensure you can hear and comprehend everything properly, I use AI Voiceover. This allows me to present the content with clear pronunciation and emphasis. You can listen to an example here: Lecture Preview
Was the course content created by AI?
A clear NO! The entire course content was created entirely by me. All videos, texts, and concepts are my own work. I record the videos, cut them, write the texts, and then have them translated into English, and then spoken by AI.
My goal is to provide you with well-formulated and clearly understandable explanations, so everyone can grasp the content easily. There's nothing worse than trying to learn from unclear explanations or poor pronunciation.
Support and Help on Discord
On my Discord, you'll experience the opposite. I offer top-notch support! If you face any difficulties, simply make a post in Discod share the GitHub link in DM with me, and I'll help you resolve the issues quickly. My aim is to provide you with the best possible assistance so you can learn without any obstacles.
If you’re not convinced after purchasing, don’t worry! You have 15 days to request a full refund. I want to ensure that you're completely satisfied with your purchase, and if the course doesn’t meet your expectations, you can get your money back with no questions asked.
Curriculum Preview
- Chapter 2 Preview – Full Movement System and Optional Jump Ahead (4:03)
- Lecture 03 - Setting up the basic Animation Blueprint (9:33)
- Lecture 04 - ABP Trajectory Pose Search Updates (8:24)
- Lecture 05 - ABP Character States Updates (30:47)
- Lecture 06 - ABP Essential Values Updates (9:58)
- Lecture 07 - Setting up Motion Matching Node Part #1 (15:40)
- Lecture 08 - Setting up Motion Matching Node Part #2 (13:26)
- Lecture 09 - Create Motion Matching Pose Search Schemas (9:30)
- Lecture 10 - Creating the First Pose Search Database and Cleaning Up the Project (7:38)
- Lecture 11 - Setting up Chooser Table (6:30)
- Lecture 12 - Adding Walking Animations (12:37)
- Lecture 13 - Adding Running Animations (7:55)
- Lecture 14 - Setting up Event Possessed (7:27)
- Lecture 15 - Setting up Enhanced Input Walk/Sprint (10:19)
- Lecture 16 - Character Movement Calculations (Pre CMC Tick) (22:12)
- Lecture 17 - Setting up Sprint (8:35)
- Lecture 18 - Character Rotation Logic (Pre CMC Tick) (6:35)
- Lecture 19 - Setting up Crouch (22:54)
- Lecture 20 - Setting Up Jump Functionality – Part 1 (CBP/ABP) (9:42)
- Lecture 21 - Setting Up Jump Functionality – Part 2 (Animation Setup) (12:45)
- Lecture 22 - Setting Up Jump Functionality – Part 3 (Chooser Table) (8:17)
- Lecture 23 - Deceleration & Friction (7:04)
- Lecture 24 - Animation Modifiers (8:23)
- Lecture 25 - Orientation Warping Modifier (7:28)
- Fix Collection Chapter 2 – Updates and Critical Corrections (3:56)
- Chapter 2 – Project Files Download (Ready to Start Chapter 3)
- Lecture 26 - Implementing the PlayerController in the Character Blueprint (8:55)
- Lecture 27 - Implementing the PlayerController Logic in the Controller Blueprint (19:13)
- Lecture 28 - Setting up ThirdPerson GamePlay Camera (12:15)
- Lecture 29 - Adjusting Camera Offset When Crouching (12:31)
- Lecture 30 - Adding Input Mapping Context for Camera Control (3:48)
- Lecture 31 - Camera Aiming (7:45)
- Lecture 32 - Implementing Toggle Between First and Third Person View (11:14)
- Lecture 33 - Adjusting Camera Collision and Renaming Elements for Clarity (4:43)
- Lecture 34 - Setting Up Item DataAssets & Inventory Component (18:24)
- Lecture 35 - Adding Resource Items and Configuring Asset Loading (8:37)
- Lecture 36 - Adding Items to the Inventory and Testing Replication (25:07)
- Lecture 37 - Setting Up the UIManager and Input Handling for In-Game Menu (30:47)
- Lecture 38 - Import UI Material Lab (3:01)
- Lecture 39 - Creating Reusable TextBlock Widgets & Text Styles (31:39)
- Lecture 40 - Creating a UI Panel Material and Its Instances (10:30)
- Lecture 41 - Building a Modular UI Panel System (15:24)
- Lecture 42 – Creating a Styled and Scrollable UI Widget (5:34)
- Lecture 43 - Building Material Instances for Inventory Slot UI (11:31)
- Lecture 44 – Building the Inventory Slot Master Widget Part 1 (Designer) (15:40)
- Lecture 45 – Building the Inventory Slot Master Widget Part 2 (Blueprint) (27:20)
- Lecture 46 - Building the Inventory Slot Master Widget Part 3 (Blueprint) (14:32)
- Lecture 47 – Creating the Reusable Inventory Panel UI (5:40)
- Lecture 48 – Setting Up the Player Inventory and Slot Grid System (24:33)
- Lecture 49 – Player Inventory Integration and Menu Setup (15:32)
- Lecture 50 – Fixing Replication Timing and Debugging Invalid References (14:02)
- Lecture 51 – Runtime UI Design Adjustments Using Material Instances (3:45)
- Lecture 52 – Implementing Item Stacking in the Inventory (23:13)
- Lecture 53 - Inventory Drag & Drop – Part 1 (Visual Setup and Operation) (12:04)
- Lecture 54 - Inventory Drag & Drop – Part 2 (Slot Hover Animation) (10:06)
- Lecture 55 – Inventory Drag & Drop – Part 3 (Stack and Move Items Between Slots) (40:38)
- Lecture 56 – GameInstance Setup and Text Style Fix via Global UI Manager (25:15)
- Lecture 57 – Implementing Slot Swapping (3:50)
- Lecture 58 – Building the Inventory Weight System (17:34)
- Lecture 59 – Restricting Inventory Items with Allowed Types (9:38)
- Lecture 60 – Inventory Sorting System Part 1 (String-Based Sort Selection) (14:10)
- Lecture 61 – Inventory Sorting System Part 2 (Numeric Sorting & Execution Logic) (22:50)
- Lecture 62 – Inventory Sorting System Part 3 (Widget Integration & Runtime Setup) (15:45)
- Lecture 63 – Subtracting Items from Inventory (12:07)
- Lecture 64 – Creating the Blur Background for the In-Game UI (12:47)
- Lecture 65 – Setting Up the Tab Navigation System for the Ingame Menu (26:51)
- Lecture 66 – Building the Item Pickup Notification Widget (14:55)
- Lecture 67 – Integrating the Item Pickup Notification into the HUD (12:28)
- Lecture 68 - Refactoring Text Style Handling – Centralized ApplyStyle Function (7:09)
- Lecture 69 – Expand Numeric Widget with Rounding, Units, and Text Style Controls (10:38)
- Lecture 70 – Building a Flexible Tooltip for Item Slots (Designer) (13:52)
- Lecture 71 – Building a Flexible Tooltip for Item Slots (Blueprint Logic) (13:37)
- Lecture 72 – Inventory Bug Fixes, Asset Redirection Management & Cleanup (12:29)
- Lecture 73 – Building the Hotbar Component and Input Handling (26:13)
- Lecture 74 - Building the Hotbar Widget (10:26)
- Lecture 75 – Highlighting Selected Hotbar Slots with Visual Feedback (9:40)
- Lecture 76 - Scrolling Through Hotbar with Mouse Input (11:50)
- Lecture 77 – Hotbar Auto-Equip on Slot Change (Client & Server Sync) (5:38)
- Lecture 78 - Building the Item Data Component for Spawned Items (15:54)
- Lecture 79 – Setting Up the Base Actor for Equippable Items (Full Replication Settings Explained) (10:26)
- Lecture 80 – Setting Up the Base Actor for Equippable Items (Blueprint Logic) (5:39)
- Lecture 81 – Building the Character Equipment Component - Part 1 (28:36)
- Lecture 82 – Finalizing the Equipment Component and Hotbar Integration - Part 2 (11:58)
- Lecture 83 – Input Setup and Testing the Equipment System - Part 3 (8:34)
- Lecture 84 – Project Cleanup and Folder Structure Refactoring (Backup) (11:30)
- Lecture 85 – Importing Axe & Pickaxe Assets (12:08)
- Lecture 86 - Expand MM_Items with Adjustable controls (Color, AO, Roughness, Specular, Normal) (17:59)
- Lecture 87 – Refactoring Character Access with Interface-Based References (17:31)
- Lecture 88 – Building the ItemEquippable Component and Character Attachment Logic (19:09)
- Lecture 89 – Creating the Equipment Socket on the Character Mesh (4:43)
- Lecture 90 – Creating Axe & Pickaxe Item Data Assets and Classes (16:21)
- Lecture 91 – Creating the Arm Pose System (14:06)
- Lecture 92 – Connecting Arm Pose Data to Character Animation (21:10)
- Lecture 93 – Creating the Equipment Animation Layer in the AnimGraph (21:57)
- Lecture 94 – Building the Arm Pose Selection System (Aiming & Movement States) (15:51)
- Lecture 95 – Building the Procedural Arm Poses Animation Layer (18:22)
- Lecture 96 – Building the AimOffset Layer Part 1 (Basic) (23:01)
- Lecture 97 - Building the AimOffset Layer Part 2 (Coruch) (10:48)
- Lecture 98 – Importing the Spear Asset and Integrating AimOffset Animation (15:07)
- Lecture 99 – Adding Hand IK Part 1 (Component) (18:18)
- Lecture 100 – Adding Hand IK Part 2 (AnimBP) (25:16)
- Lecture 101 – Setting Up Custom Blend Masks for FP and TP Views (8:56)
- Lecture 102 – Building the Item Use Component (Single/Automatic/Burst) (23:04)
- Lecture 103 – Finalizing the Equip and Attack Animations (26:56)
- Lecture 104 – Finalizing Arm Poses (11:16)
- Lecture 105 – Implementing Hand Sway Animation (8:53)
- Lecture 106 – Cleaning Up Player Controller with Interfaces (11:05)
- Lecture 107 – Cleaning Up UI Manager with Interfaces (19:52)
- Lecture 108 – Building the Gameplay Tags Component (17:19)
- Lecture 109 – Tag Change Dispatcher and Diff Processing (11:11)
- Lecture 110 – Building a Debug Widget for Active Gameplay Tags (9:16)
- Lecture 111 – Add Selective Gameplay Tag Listeners (15:54)
- Lecture 112 - Building Attribute System Base Component (22:27)
- Lecture 113 - Implementing Attribute Replication (7:19)
- Lecture 114 – Finalizing Attribute Change Events (11:13)
- Lecture 115 – Add Functionality to Modify Attributes Instantly (22:35)
- Lecture 116 – Implementing Inventory Weight Attribute and UI Integration (9:53)
- Lecture 117 - Implementing Attribute Threshold-Based Status Tags (22:22)
- Lecture 118 – Building Persistent Attribute Modifiers Part 1 (Add and Apply Logic) (21:18)
- Lecture 119 – Building Persistent Attribute Modifiers Part 2 (Remove Logic) (15:29)
- Lecture 120 – Building the Gameplay Effect Base Blueprint (21:17)
- Lecture 121 – Building the Gameplay Effect Executor (26:40)
- Lecture 122 – Implementing Infinite Effects and Execution Delay Logic (9:22)
- Lecture 123 – Periodic Effects and HasDuration Logic Integration (8:01)
- Lecture 124 – Granted Tags Logic (6:51)
- Lecture 125 – Building the Tag Listener System and Automatic Effect Stop (10:50)
- Lecture 126 – Evaluating Effect Values with Live Attributes (9:49)
- Lecture 127 – Finalizing Derived Stat Execution and Periodic Scaling (16:14)
- Lecture 128 – Building the Player Attribute Panel UI (23:11)
- Lecture 129 – Dynamic UI Updates for Food and Water Attributes (23:47)
- Lecture 130 – Animated Progress Bar with Interpolation and Delay Effect (15:03)
- Lecture 131 – Setup HealthBar Widget and Attribute System Link (17:56)
- Lecture 132 – Debug Attribute Widget Part 1: Tag Filtering and Cleanup (9:57)
- Lecture 133 – Debug Attribute Widget Part 2: Real-Time Attribute Debug (18:54)
- Lecture 134 – Attribute System Loader and Simplified Gameplay Effect Handling (17:36)
- Lecture 135 – Final Attribute Fixes and UI Icon Polish (5:17)
- Lecture 136 – ApplyGameplayEffect with Evaluated Context Logic (31:23)
- Lecture 137 – Building Tag-Based Effect Validation in StartGameplayEffect (21:10)
- Lecture 138 – Spawning and Tracking Gameplay Effect Executors with Cleanup Logic (25:44)
- Lecture 139 – Spawning and Tracking Conditional Gameplay Effects (27:03)
- Lecture 140 – Finalizing Gameplay Effect Cleanup and Tag Display Fix (27:44)
- Lecture 141 – Setting Up the Ability Base Class and Macro System (34:47)
- Lecture 142 – Building Start and End Functions for the Ability Base Class (19:48)
- Lecture 143 - Creating Ability Instances (24:58)
- Lecture 144 – Giving and Replicating Abilities at Runtime (38:50)
- Lecture 145 – Ability Activation & Stop Logic (27:11)
- Lecture 146 – Ability Commit Logic Part 1 (Execution Permission Check) (18:30)
- Lecture 147 – Ability Commit Logic Part 2 (Tag Handling and Prediction) (23:12)
- Lecture 148 – First Ability Execution and Stop Handling (28:01)
- Lecture 149 – Refactoring Aiming to Gameplay Tags (18:44)
- Lecture 150 – Tag-Based Movement States: Walking and Crouching Control (11:58)
- Lecture 151 – Building Jump Ability & Cancel Logic on Commit (13:36)
- Lecture 152 – Implementing Cost Logic (18:50)
- Lecture 153 – Adding Stamina Attribute and Jump Ability Cost (6:37)
- Lecture 154 – Build Stamina Widget & Connect to Attribute System (16:15)
- Lecture 155 – Build Sprint Ability (16:24)
- Lecture 156 – Building Stamina Regeneration with Passive Ability (17:07)
- Lecture 157 – Refactoring Gameplay Tag Application with Internal Reference Counting (14:08)
- Lecture 158 – Building Food Drain & Starvation Ability (12:02)
- Lecture 159 – Building Water Drain & Dehydration Ability (5:39)
- Lecture 160 – Abilities Activation By InputID (8:30)
- Lecture 161 – Sprint Fix & Improvements (7:41)
- Lecture 162 – Upgrade Project to 5.6.1 (Gameplay Camera Quick Fix) (18:24)
- Lecture 163 – Single-Source ItemData Part 1: Variables & Foundations (11:31)
- Lecture 164 – Single-Source ItemData Part 2: Structures & Interfaces (20:33)
- Lecture 165 – Single-Source ItemData Part 3: Implementing the Interface (12:28)
- Lecture 166 – Single-Source ItemData Part 4: Replacing PDAs & Fixing References (22:29)
- Lecture 167 – Single-Source ItemData Part 5: Item Profiles & Data Tables & Fixes (18:29)
- Lecture 168 – Single-Source ItemData Part 6: Replace API Assets Interface (6:20)
- Lecture 169 – Item Ability Execution (24:05)
- Lecture 170 – Setting Up Item Impact Component & Anim Notify Integration (15:23)
- Lecture 171 – Implementing Local Item Impact Traces & Client Hit Reports (16:47)
- Lecture 172 – Server-Side Impact Validation (14:35)
- Lecture 173 – Implementing Item Use & Costs (19:47)
- Lecture 174 – Setting Up Hands Logic & Final Bug Fixes (31:49)
- Lecture 175 – Fixing Camera Activation with Two Clients (5:39)
- Lecture 176 – Downloading & Optimizing Tree Assets (12:33)
- Lecture 177 – Setting Up Tree Mesh Variations and Collision (13:32)
- Lecture 178 – Adding Material Slots & Adjusting UVs for Stump/Fallen Tree (22:39)
- Lecture 179 – Adding Collisions and Finalizing Tree Mesh Setups (19:19)
- Lecture 180 – Creating Core Data Assets and Enums (21:18)
- Lecture 181 – Building the Harvestable Master Blueprint and Tree Data Integration (20:03)
- Lecture 182 – Creating the Harvesting Manager and Harvestable Interface (21:37)
- Lecture 183 – Implementing Harvest Logic in the Impact Component (11:56)
- Lecture 184 – Implementing Base Harvest Damage and Depletion Logic (13:58)
- Lecture 185 – Implementing Residual Stump Spawn Logic (20:16)
- Lecture 186 – Building Spawning the Fallen Tree and Fall Trigger (24:12)
- Lecture 187 – Setup Fallen Tree Physics and Replication (13:43)
- Lecture 188 – Fixing Impact Validation and Tree Fall Physics (8:46)
- Lecture 189 – Creating and Spawning Geometry Collections for Tree Stumps (28:40)
- Lecture 190 – Creating Geometry Collections for All Stumps (28:43)
- Lecture 191 – Spawning Tree Logs Part 1: Segment Calculation (15:42)
- Lecture 192 – Spawning Tree Logs Part 2: Transform Calculation and Geometry Collection Setup (18:07)
- Lecture 193 – Implementing Scaled Loot Initialization Logic (16:57)
- Lecture 194 – Building Loot Accumulation Logic Part 1: Calculation (14:13)
- Lecture 195 – Building Loot Accumulation Logic Part 2: Payout (15:24)
- Lecture 196 – Implementing Harvest Scale and Loot Multipliers (9:55)
- Lecture 197 – Implementing Harvest Resistance and Tool Efficiency (19:48)
- Lecture 198 – Creating and Adding the Iron Axe, Pickaxe and Resource Items (28:03)
- Lecture 199 – Setting Up Loot Profiles, Fixing Issues and Accumulating Loot (25:35)
- Lecture 200 – Implementing the Pop-and-Sink Depletion Effect (15:24)
- Lecture 201 – Setting Up Bush Harvesting and Fixing Minor Issues (12:22)
- Lecture 202 – Creating the Rock Asset and Setting Up Harvesting Stages - Part 1 (17:38)
- Lecture 203 – Creating the Rock Asset and Setting Up Harvesting Stages - Part 2 (17:57)
- Lecture 204 – Creating the Generic World Item Pickup Blueprint Part 1 (19:20)
- Lecture 204 – Creating the Generic World Item Pickup Blueprint Part 2 (11:51)
- Lecture 206 – Building the Interaction Component Part 1: Client (15:29)
- Lecture 207 – Building the Interaction Component Part 2: Server (9:29)
- Lecture 208 – Building the Dot Crosshair Widget Part 1: Prompt Image (12:31)
- Lecture 209 – Building the Dot Crosshair Widget Part 2: Dot (10:26)
- Lecture 210 – Building the Handle Interact Prompt Image (17:46)
- Lecture 211 – Finalizing Interaction Prompts with New- and Lost-Target Events (9:11)
- Lecture 212 – Building a Simple PCG Harvestable Mapping Workflow Part 1 (8:47)
- Lecture 213 – Building a Simple PCG Harvestable Mapping Workflow Part 2 (14:43)
- Lecture 214 – Finishing the Harvesting Manager Setup for PCG Harvestables (15:57)
- Lecture 215 – Building the Impact Effect System Base (21:13)
- Lecture 216 – Implementing first Particle Effects (38:50)
- Lecture 217 – Implementing Sounds for Surface Impacts Part 1 (21:15)
- Lecture 218 – Implementing Sounds for Surface Impacts Part 2 (31:59)
- Lecture 219 – Implementing Physics-Based Impact Sounds with Concurrency Control (26:48)
- Lecture 220 – Adding Harvestable Respawn Logic (15:49)
- Lecture 221 – Refactoring the Hotbar Selection Logic and Fixing Slot Highlighting (25:07)
- Lecture 222 – Inventory Refactor Part 1: Inventory Base Component (28:54)
- Lecture 223 – Inventory Refactor Part 2: InventoryManager (Add Item) (40:16)
- Lecture 224 – Inventory Refactor Part 3: Interface Routing & Public Requests (31:03)
- Lecture 225 – Inventory Refactor Part 4: Moving Inventories & Updating Slot Widgets (31:53)
- Lecture 226 – Inventory Refactor Part 5: Replication & Fixing First Runtime Issues (30:40)
- Lecture 227 – Inventory Refactor Part 6: Restoring Transfers, Sorting & Runtime Fixes (44:54)
- Lecture 228 – Inventory Refactor Part 7: Finalizing Replication, Fixes & Cleanup (29:00)
- Lecture 229 – Inventory Double-Click Transfers & Hotbar Fix (32:58)
- Lecture 230 – Optimizing Slot Grid Creation and Tooltip Delay (15:01)
- Lecture 231 – Refactoring TextBlock Widget for Common UI Styles (26:05)
- Lecture 232 – Inventory Context Menu Part 1: Button Base and Context Widget Setup (26:48)
- Lecture 233 – Inventory Context Menu Part 2: Stack Splitting and Transfer Modes (35:11)
- Lecture 234 – Inventory Context Menu Part 3: Drop Logic and Consumable Items (19:21)
- Lecture 235 – Building a Dynamic Quantity Selector Widget (42:08)
- Lecture 236 – Building the Reusable Modal Shell (24:05)
- Lecture 237 – Inventory Context Menu Part 4: Partial Stack Splitting (11:25)
- Lecture 238 – Building a Reusable Player Inventory View (37:35)
- Lecture 239 – Inventory Hotkeys & Quick Inventory Actions (9:48)
- Lecture 240 – UI Close Flow, Inventory Replication Fixes & Auto Scrollbars (16:35)
- Lecture 241 – Finalizing Inventory Manager Logic for Crafting (44:42)
- Lecture 242 – Fixing Struct Reference Issues After Inventory Context Refactor (25:46)
- Lecture 243 – Refactoring PlayerState & PlayerController Bootstrap Flow (15:51)
- Lecture 244 – Upgrading to Unreal Engine 5.7.4 & Expanding Interaction (25:43)
- Lecture 245 – Game Data Manager, Tooltip Fixes & Inventory UI Cleanup (31:16)
- Lecture 246 – Creating Item Data Assets for Crafting (10:32)
- Lecture 247 – Building an Admin Item Menu for Testing (16:45)
- Lecture 248 – Creating Item Recipes & Recipe Utility Functions (35:00)
- Lecture 249 – Recipe Panel Part 1: Crafting Component & Recipe Widget (33:53)
- Lecture 250 – Recipe Panel Part 2: Recipe Slot Widget (26:17)
- Lecture 251 – Building the Recipe Tooltip Widget (16:40)
- Lecture 252 – Building the Selected Recipe Panel (23:58)
- Lecture 253 – Building the Required Items Panel (34:11)
- Lecture 254 – Creating the Crafting Request Flow (13:28)
- Lecture 255 – Crafting the First Items (36:19)
- Lecture 256 – Building & Managing the Crafting Queue Panel (45:01)
- Lecture 257 – Crafting Queue Progress & UI Fixes (20:51)
- Lecture 258 – Fixing the PlayerState Flow for 3-Player Multiplayer (5:50)
- Lecture 259 – Buildable Foundations, Viewer Replication & Storage Setup (29:57)
- Lecture 260 – Finalizing the Storage View & Item Transfer Flow (26:50)
- Lecture 261 – Building the Fuel Component (42:56)
- Lecture 262 – Building the Device State Component (10:48)
- Lecture 263 – Building the Crafting Station Component (41:54)
- Lecture 264 – Bug Fixes & Cleanup Part 1: Inventory & UI (25:28)
- Lecture 265 – Bug Fixes & Cleanup Part 2: Tooltips, Fonts & UI Polish (21:25)
- Lecture 266 – Building the Crafting Station Base Blueprint (33:20)
- Lecture 267 – Finalizing the Workbench UI & Crafting Flow (33:46)
- Lecture 268 – Building the Fuel Widget & Fuel Profile Setup (38:36)
- Lecture 269 – Finalizing Device Control & Fuel Widget (41:14)
- Lecture 270 – Improving Inventory Auto Transfer, Sort Menu UI & Button Styling (13:18)
- Lecture 271 – Setting Up the Forge, Automatic Processing & Fueled Station Panel (27:23)
- Lecture 272 – Building Input/Output Storage for Crafting Stations (38:31)
- Lecture 273 – Placeable Assets, Buildable Effects, and Chest Interaction Setup (35:33)
Roadmap
Chapter 1 – The First Steps
Foundations, project setup, and an introduction to Unreal Engine
Chapter 2 – Motion Matching
Implementation of realistic animations and movement systems
Chapter 3 – Gameplay Camera
Input control and camera system for a dynamic game world using GameplayCamera component
Chapter 4 – Inventory System & User Interface
Creation a modular inventory system. You'll build a fully dynamic slot-based inventory with drag-and-drop support, stack management, weight handling, and validation logic & much more. Alongside the system, you'll design a responsive user interface that connects seamlessly with the gameplay logic, including tooltips, dynamic updates, and interactive visual feedback.
Chapter 5 – Equipment System, Hotbar & Dynamic Animation
Covers the complete implementation of a modular equipment system, including hotbar functionality and character attachment logic. We build workflow for equipping tools and weapons, synchronized across all players. Using dynamic animation layers, we integrate procedural arm poses, AimOffset blending, hand IK, and camera-based pose selection. Items are fully data-driven with customizable materials, and integrated seamlessly into the animation graph.
Chapter 6 – Base Attributes & Gameplay Effect System
Build a fully custom attribute and gameplay effect system, inspired by GAS but fully Blueprint-based and designed for scalability and multiplayer optimization. We begin by building a flexible Gameplay Tag component with listener support and dispatch logic, followed by a modular attribute component that replicates core stats like health, hunger, and stamina. You will implement persistent effects, execute periodic or instant changes, and link gameplay attributes to UI in real time. The system includes status effects, granted tag logic, effect evaluation with live values & more.
Chapter 7 – Player Ability System
Implementing special abilities using Gameplay Effects and Tags that rely on character attributes similar to GAS from Unreal.
Chapter 8 – Data-Driven Items & Ability-Based Equipment
This chapter introduces a single-source approach for item data, replacing scattered PDAs with a centralized system. You will learn how to structure and interface item data, implement profiles through Data Tables, and prepare the foundation for ability-driven item usage.
Chapter 9 – Harvesting System
Design a simple, brilliant harvesting system that can spawn trees either directly or via procedural-content generation (PCG). Trees scale by size and carry configurable properties, loot tables, hitpoints, drop counts, and harvest difficulty, so yields and durability change naturally with tree type and scale. The system is intentionally minimal and flexible: easy to hook into your item, ability and attribute frameworks, supports tool efficiency and attribute modifiers, and validates actions for multiplayer. Whether you need single-instance landmark trees or mass-PCG forests, this system adapts to setting and setup with minimal effort.
Chapter 10 – Crfating System
What’s Next in the Course
Next up, we’ll build the complete system for harvesting natural resources like trees, rocks, and plants. Players will be able to chop down trees, mine materials, and interact with the environment using tools.
Once resources are collectible, we’ll expand into a modular crafting system. Items like tools, weapons, and consumables can be crafted dynamically based on recipes and player inventory.
With crafting in place, we’ll move on to building systems. Players will be able to place and build structures, from simple foundations to complete bases, using placement and snapping logic with follow, allowing items to be stored, sorted, and processed.
We’ll integrate a fully modular weapon and armor system, allowing players to equip gear that changes both their appearance and stats. Melee and ranged combat systems will be included.
As the game world grows, we’ll implement a full MetaHuman-based character system, replacing the default mesh with a high-quality, customizable character.
Group mechanics will add cooperative depth, allowing players to form and manage clans with shared storage, permissions, and communication tools.
To improve navigation, we’ll add a dynamic minimap and compass that shows direction, markers, and points of interest in real time.
NPCs and wildlife will bring life to the world through behavior trees, routines, and AI interactions like fleeing, attacking, or wandering naturally.
A save and load system will ensure persistent progress across sessions, including inventory, position, and world state with final setup set up Steam & Epic session management to prepare your survival game for publishing.
Notice: This course is currently in Early Access. Chapters and content may be adjusted, expanded, or updated depending on the ongoing development and community feedback.
FAQ - Frequently Asked Questions
General Course Information
What kind of experience do I need before taking this course?
You do not need to be a pro, but a bit of Unreal Engine knowledge helps. If you know what Blueprints are and can navigate the editor, you are ready to go.
Is this course suitable for complete beginners or more advanced users?
The course is designed for both. Beginners can follow every step, while advanced users will appreciate the structure, optimization, and multiplayer focus.
Do I need to know how to code or use Blueprints before starting?
No coding needed. Everything is done with Blueprints. If you are new to them, you will quickly learn through hands-on practice in the course.
Course Structure & Progress
How is the course structured?
The course is divided into clear chapters, each covering one core system or topic. Every lesson builds on the previous one to ensure a smooth learning curve.
Can I skip chapters or do I need to follow the order?
You can jump around, but it is strongly recommended to follow the order, especially in the early chapters, since many systems build on each other.
Are the chapters released weekly, monthly, or irregularly?
New chapters are added regularly, but not on a fixed schedule. Quality comes first, so each release is carefully prepared, tested, and polished.
How many chapters and lessons are planned in total?
Many chapters are planned, with hundreds of step-by-step lessons covering every major gameplay system in a full multiplayer game.
What is the current progress of the course development?
The course is well underway with over 150+ published lessons and new content in production. You can check the live curriculum and updates on the course page or Discord.
Project Files & Publishing
Can I publish or sell the game I create from this course?
Yes, you are completely free to publish or sell your game. Just make sure to build something unique by expanding and customizing it beyond what is taught in the course.
Can I use the assets or systems in my own commercial projects?
Absolutely. All systems you learn here can be used in commercial projects. However, you are not allowed to sell or redistribute the raw course files or content itself.
Is the final project file included with the course?
No. The course focuses on step-by-step learning. The final project is not part of the course by default but can be purchased separately for those who want a complete reference.
Where can I download the full project if I want it?
You can get the full project files anytime at Download full project as a separate optional download.
Video Access & Subtitles
Are subtitles available for all lectures?
Yes. All current lectures include English subtitles, carefully synced to match Unreal Engine’s terminology and flow.
Which subtitle languages are currently supported?
You can watch the course with high quality subtitles in these languages:
English · German (Deutsch) · French (Français) · Spanish (Español) · Portuguese (Português – Brazil) · Italian (Italiano) · Polish (Polski) · Turkish (Türkçe) · Russian (Русский) · Arabic (العربية – Saudi Arabia) · Hindi (हिन्दी – India) · Korean (한국어 – Korea) · Chinese (中文 – Simplified) · Chinese (中文 – Hong Kong) · Japanese (日本語 – Japan) · Ukrainian (Українська – Ukraine) · Dutch (Nederlands) · Czech (Čeština) · Swedish (Svenska) · Danish (Dansk) · Finnish (Suomi) · Norwegian (Norsk) · Thai (ไทย) · Indonesian (Bahasa Indonesia) · Greek (Ελληνικά) · Bengali (বাংলা – Bangladesh) · Vietnamese (Tiếng Việt)
Can I request subtitles in other languages?
Yes. If your preferred language is missing, feel free to reach out. I’m happy to add more based on demand.
Can I download the videos and watch them offline?
Not currently. To prevent piracy, offline downloads are disabled. But you get lifetime access to stream everything online at any time.
Will I lose access to the course after a certain time?
Nope. You’ll have full, permanent access to all current and future content, no time limits, no hidden fees.
Course Updates & Lifetime Access
Is this a one-time purchase or subscription?
It’s a one-time purchase. No monthly fees, no subscriptions – just full access with a single payment.
Do I get lifetime access including all future updates?
Yes. You’ll receive lifetime access to everything, including all new lectures, improvements, bug fixes, and additional content added after your purchase.
Will the course receive updates after it is finished?
Absolutely. Even after the full course is released, I’ll continue to maintain and expand it with refinements, improvements, and optional advanced modules if needed.
What happens if Unreal Engine updates to a new version?
Unreal Engine is constantly evolving. When major changes affect the course content, I’ll release updated lectures or add notes to keep everything compatible and relevant until version 5.6. Your access to those updates is included.
Technical Support & Troubleshooting
What should I do if I run into bugs while following the course?
Bugs are a normal part of game development. The course encourages a realistic approach: instead of hiding issues, I show how to recognize, debug, and fix them like in real production environments.
Does the course teach how to fix and debug issues?
Yes! troubleshooting is built into the learning process. You'll see how to approach problems, analyze unexpected behavior, and solve issues using practical debugging techniques.
Is there a community or Discord server where I can ask for help?
Absolutely. You'll find an active and helpful Discord community where you can ask questions, share progress, and get support from both me and other students.
Community & Feedback
Where can I ask questions if I get stuck?
Join the Discord server linked in the course dashboard. It’s the best place to get help, whether you're facing a bug or need clarification.
Can I show my progress or project to others?
Yes! Sharing your progress is highly encouraged. We love seeing what students create, and it's a great way to get feedback and inspire others.
Is there a way to share feedback or suggestions?
Definitely. You can post ideas or suggestions in the Discord server, and I regularly review feedback to improve the course.
Payment & Refunds
What is your refund policy?
Refunds are handled through Teachable’s official policy. You can request a refund within 15 days of purchase by contacting Teachable support directly.
Can I try the course before buying it?
Yes! a free 2-day trial is available so you can test the course and decide if it’s right for you before committing. Discord access is not included in the 2-day trials.
Legal & Ethical Use
Can I share course content with others?
No. Course materials are for personal use only. Sharing content, videos, or files with others is not permitted.
Am I allowed to resell or redistribute the course files?
No. Reselling, redistributing, or uploading course materials elsewhere is strictly prohibited and violates the license terms.
What is the legal status of the systems I build through the course?
You’re free to use the systems and techniques you learn here in your own personal or commercial projects. However, the original course content and files cannot be resold or rebranded.
All Content is © MSGCourse.com